
This is the second article in a series of articles on making landscape designs easy.
Most students of landscape design know there are 4 different types of drawings which lead to a final design. They are (1) a base map, (2) site inventory and analysis, (3) functional diagram, and (4) preliminary design. All four drawings are necessary for the production of the final design (or master design).
It is in the functional diagram that we begin to lay out areas for hardscaping, turf and plant placement. I cannot emphasize enough the importance of plant placement, or to put it another way, “plant placement” distance. Plants can lose their identity when jammed together and become a complex mess by making the “landscaping” too big for the site. Albert Einstein, once said, “ any intelligent fool can make things bigger and more complex…it takes a touch of genius – and a lot of courage to move in the opposite direction.”
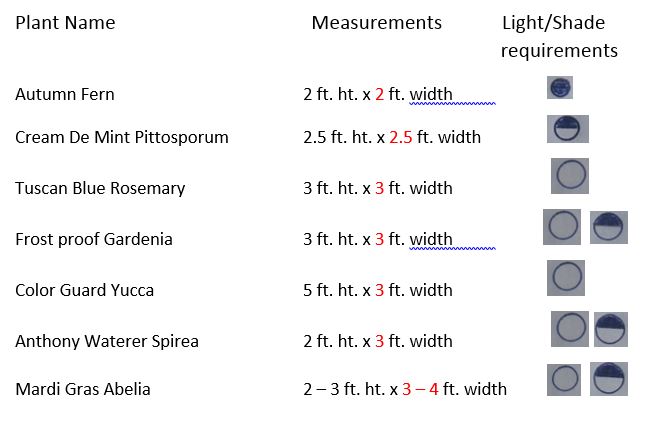
The following is a technique that I recently developed while instructing a class in landscape design at Midlands Technical College. This technique involves listing plant material at it’s mature height and width which will thrive in a designated area (i.e. full sun, part-shade, full shade). On the preliminary design, each plant would be represented by a circle where the scale is “one inch equals ten feet”. A clear circle indicates the plant’s mature growth in full sunlight; a half darkened circle indicates the plant’s mature growth in part shade; and a completely darkened circle indicates a plant’s mature growth in full shade.
Using this method, here’s an example of how plants would be represented on a preliminary landscape design:
Here are the drawing steps for use on the preliminary design:
Draw the desired circles by using a “circles’ template (the scale is: 1” = 10’). Make sure shrubs which are chosen do not grow above window sills. Plants are tagged by their function and aesthetic values. Trees, shrubs and groundcover will be named later.
Once all elements have been drawn on the preliminary landscape design, name all plants.
All students taking the Landscape Design Class were drawing functional landscape designs after only a few hours…something that previously would not have been likely, except for those few students who had access to expensive Landscape Design CAD (Computer Assisted Design) software.
If you would like to redesign your landscape, consider taking the next Landscape Design course (taught on one weekday evening from 6 to 9 PM for eight weeks in a row). The next course is slated to begin in Feb. 2016. The cost of the course is in the $200 range. That’s only about $8.00/hour. And it is several hundred $’s less than a professional landscape designer would charge for a plan. Then too, by taking the course, you would gain a much better grasp of the principals involved in Landscape Design. You may even meet a few landscape contractors who might be able to help you implement your landscape design, should you desire to do so.
For more information:
Copy & paste http://www.midlandstech.edu/training-search?term=landscape%20design into your browser, or contact Ron Cowart @ cowartconsuting@gmail.com